
Establishing a lush, green lawn on slopes presents unique challenges that require effective strategies and techniques. In New Zealand, where diverse landscapes and varying climates are the norm, growing grass on sloped areas can be particularly tricky. Among various methods of seeding, hydroseeding stands out as the most effective solution for tackling these challenges. This blog post will explore why hydroseeding is the best choice for growing grass on slopes and how it can transform challenging terrains into beautiful green spaces.
The Challenges of Growing Grass on Slopes
Before delving into the advantages of hydroseeding, it’s essential to understand the specific challenges associated with growing grass on slopes:
1. Soil Erosion
One of the primary concerns with slopes is soil erosion. When rain falls on an incline, it can wash away the topsoil, carrying away seeds and nutrients necessary for grass growth. This can lead to bare patches and diminished soil quality.
2. Moisture Retention
Sloped areas often have varying moisture levels, with the upper portions drying out quickly while the lower parts can become waterlogged. This inconsistency can make it difficult for grass to establish a strong root system.
3. Sunlight Exposure
Slopes can have uneven sunlight exposure depending on their orientation. South-facing slopes in New Zealand may receive less sunlight, making it harder for grass to grow, while north-facing slopes may be more prone to drying out.
4. Access for Maintenance
Maintaining grass on slopes can be challenging due to accessibility issues. Mowing, watering, and applying fertilizers can be more complicated on an incline, leading to uneven growth and maintenance challenges.
5. Seed Displacement
Traditional seeding methods can lead to seed displacement. Wind, water, and gravity can easily move loose seeds, resulting in uneven germination and patchy grass coverage.
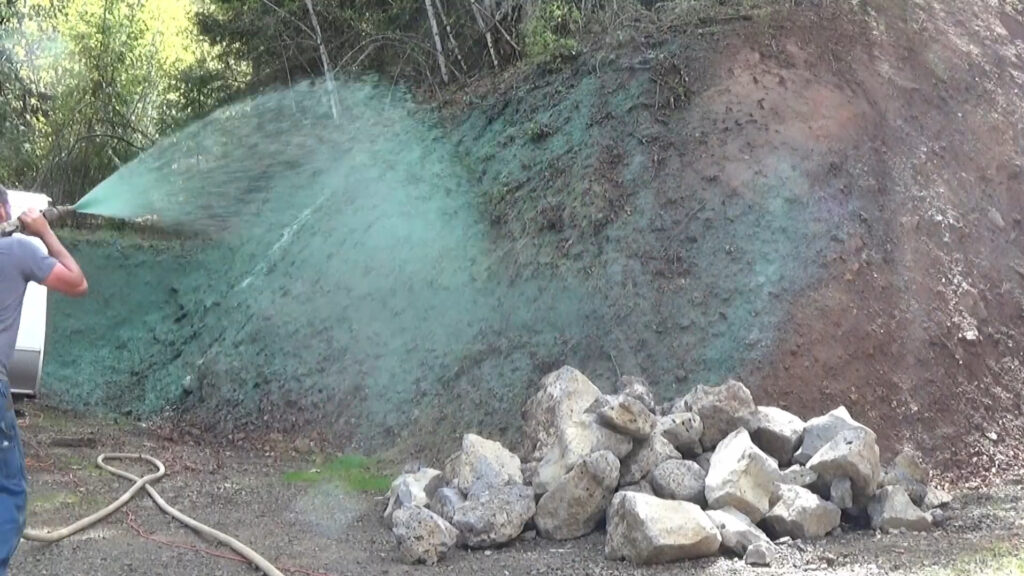
Why Hydroseeding Works Best for Slopes
Hydroseeding, a method that involves spraying a mixture of seed, water, and mulch onto the soil, effectively addresses many of the challenges associated with growing grass on slopes. Here are several reasons why hydroseeding is the optimal choice:
1. Enhanced Erosion Control
The slurry created during hydroseeding contains mulch, which helps anchor seeds to the soil, reducing the likelihood of erosion. The mulch acts as a protective layer that prevents soil from being washed away during heavy rains, ensuring that seeds remain in place for successful germination.
2. Improved Moisture Retention
The hydromulch used in hydroseeding retains moisture effectively, creating a conducive environment for grass seeds to germinate. This is particularly beneficial for sloped areas that experience uneven moisture levels, as the mulch helps retain moisture on the surface, promoting consistent growth even during dry spells.
3. Uniform Seed Distribution
Hydroseeding allows for uniform distribution of seeds across the slope. The slurry is sprayed evenly, ensuring that all areas receive an adequate amount of seed. This uniformity leads to consistent germination and growth, reducing the risk of patchiness that often occurs with traditional seeding methods.
4. Rapid Germination and Establishment
Grass seeds in a hydroseeding mixture typically germinate faster than those sown using traditional methods. The combination of moisture, nutrients from the mulch, and a protective layer helps seeds sprout within a short period. This rapid establishment is crucial on slopes, as it minimizes the time that bare soil is exposed to erosion.
5. Versatile Seed Options
Hydroseeding allows for the mixing of various seed types, enabling you to select grass varieties that are best suited for your specific slope conditions. For example, if your slope receives a lot of sun, you can choose drought-resistant varieties; if it’s shaded, you can select shade-tolerant grasses. This versatility ensures that your hydroseeded lawn is robust and able to thrive in its environment.
6. Reduced Maintenance Needs
Once established, hydroseeded lawns typically require less maintenance compared to traditional seeded lawns. The resilient grass that emerges from hydroseeding is often better equipped to withstand environmental stressors such as drought, pests, and diseases. This resilience means that slopes can remain healthy and vibrant with less frequent mowing and watering.
7. Aesthetic Appeal
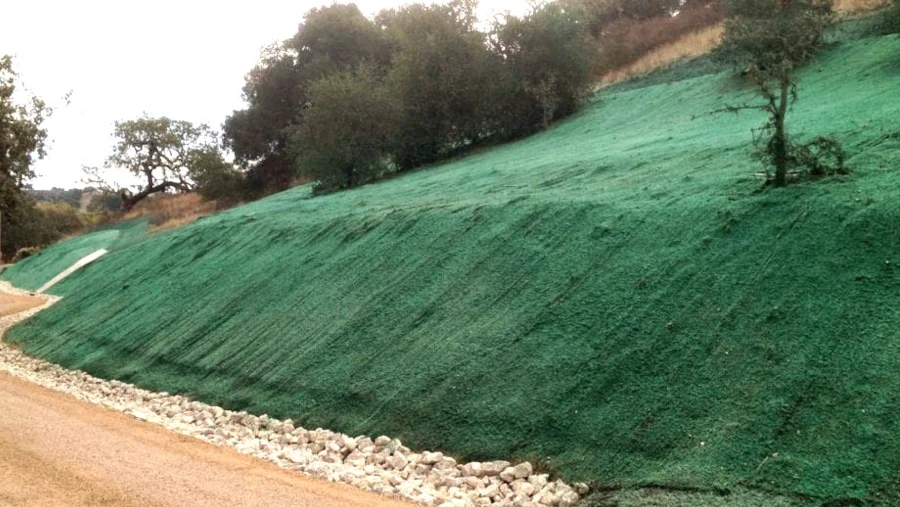
A well-established hydroseeded lawn on slopes creates a visually appealing landscape. The uniformity of growth and lush green grass enhance the overall aesthetics of your property, making it more inviting and enjoyable for outdoor activities.
Best Practices for Hydroseeding on Slopes
To maximize the effectiveness of hydroseeding on slopes, follow these best practices:
1. Prepare the Site Properly
Before hydroseeding, ensure that the site is properly prepared. Clear away debris, weeds, and rocks, and grade the slope to promote proper drainage. The better the preparation, the more successful the hydroseeding will be.
2. Choose the Right Time for Hydroseeding
The timing of hydroseeding is crucial for success. In New Zealand, the best time to hydroseed is during the spring or autumn when temperatures are moderate and rainfall is more predictable. Avoiding the hot summer months will help retain moisture and support germination.
3. Select Quality Grass Seed
Invest in high-quality grass seed that is appropriate for your specific slope conditions. Look for seed blends that are designed for erosion control and are suitable for the climate and soil type in your area.
4. Monitor Moisture Levels
After hydroseeding, keep the area consistently moist until the grass is established. Watering may be necessary, especially during dry periods, to ensure that the grass seeds have the moisture they need to germinate and grow.
5. Avoid Heavy Foot Traffic
Once hydroseeding is completed, limit foot traffic on the newly hydroseeded area to allow the grass to establish properly. Too much foot traffic can displace seeds and hinder growth.
6. Regular Maintenance
Once the grass has established, continue with regular lawn maintenance, including mowing, fertilization, and pest control, to keep the slope looking healthy and vibrant.
Conclusion
Hydroseeding is undoubtedly the best method for growing grass on slopes in New Zealand. Its ability to control erosion, retain moisture, provide uniform seed distribution, and establish grass quickly makes it the ideal choice for challenging terrains. By following best practices and utilizing hydroseeding, homeowners and landscapers can transform sloped areas into lush, green lawns that enhance the beauty and functionality of their outdoor spaces.
If you’re ready to tackle your sloped lawn with hydroseeding, contact Hydroseeding by LandscapingHQ today for expert advice and professional hydroseeding services tailored to your needs!
A lush, green lawn can significantly enhance the aesthetic appeal and functionality of your outdoor space. Hydroseeding is a popular method for establishing a vibrant lawn, particularly in New Zealand, where it has gained traction due to its efficiency and effectiveness in promoting healthy grass growth. However, the work doesn’t stop once the hydroseeding process is complete. Maintaining your hydroseeded lawn is crucial to ensuring its longevity, health, and beauty. In this comprehensive guide, we’ll cover essential tips for maintaining a hydroseeded lawn, tailored specifically for the New Zealand climate.
1. Understanding Hydroseeding
Before diving into maintenance, it’s essential to understand what hydroseeding entails. Hydroseeding is a planting process that combines seed, mulch, water, and fertilizers into a slurry, which is then sprayed onto the prepared soil. This method provides several advantages, including:
- Even Distribution: The slurry ensures that seeds are spread uniformly across the area, reducing the chances of bare spots.
- Moisture Retention: The mulch helps retain moisture in the soil, which is vital for seed germination.
- Protection: The mulch layer protects the seeds from wind, rain, and erosion, especially in New Zealand's variable weather conditions.
While hydroseeding offers numerous benefits, maintaining a hydroseeded lawn requires specific care to ensure the grass establishes properly and thrives.
2. Initial Care After Hydroseeding
The first few weeks after hydroseeding are critical for the establishment of your lawn. Here’s what you should focus on:
A. Watering
Proper watering is the cornerstone of successful hydroseed maintenance.
- Frequency: For the first 2 to 3 weeks, water the area lightly 2 to 3 times a day. This frequency ensures that the seeds remain moist but not waterlogged.
- Technique: Use a fine mist to avoid washing away the mulch. Gradually reduce the frequency as the grass begins to germinate, transitioning to deeper watering sessions.
- Signs of Drought Stress: Watch for signs such as wilting grass or a change in color (grass turning bluish) to adjust your watering schedule.
B. Avoiding Foot Traffic
It’s essential to keep foot traffic off the hydroseeded area for the first few weeks. This allows the seeds to germinate and establish roots without disturbance.
3. Ongoing Lawn Care
Once your hydroseeded lawn has germinated and grown to about 2-3 inches tall, it's time to shift your focus to ongoing maintenance. Here are some essential tips:
A. Mowing
Mowing is a vital part of maintaining your hydroseeded lawn.
- First Mow: Wait until the grass reaches about 3-4 inches in height before the first mow. Ensure your mower blades are sharp to avoid tearing the young grass.
- Cutting Height: Set your mower to a higher cutting height (about 2.5 to 3 inches) to encourage deeper root growth. This height also helps the grass retain moisture.
B. Fertilization
Fertilizing your lawn helps promote healthy growth and lush greenery.
- Initial Fertilization: If you used a fertilizer in your hydroseeding slurry, you may not need to fertilize for the first 6 to 8 weeks.
- Subsequent Fertilization: After the initial period, apply a slow-release nitrogen fertilizer every 6-8 weeks during the growing season. This will support continued growth and health.
C. Weed Control
Weeds can compete with your grass for nutrients and water, so managing them is crucial.
- Preventative Measures: Apply a pre-emergent herbicide before the seeds germinate to reduce weed growth.
- Manual Removal: For existing weeds, hand-pull or use a spot treatment with a suitable herbicide, taking care to avoid contact with your grass.
D. Aeration
Aeration helps to relieve soil compaction, allowing nutrients and water to penetrate more effectively.
- Timing: Aerate your lawn once or twice a year, ideally during the growing season (spring and autumn).
- Method: Use a core aerator, which removes plugs of soil to enhance airflow and root growth.

4. Seasonal Maintenance Tips
A. Spring Maintenance
Spring is a vital time for lawn care in New Zealand. As temperatures rise, follow these steps:
- Raking: Rake away any debris left over from winter to promote healthy growth.
- Fertilizing: Apply a balanced fertilizer to kickstart growth.
- Weed Control: Keep an eye out for emerging weeds and manage them promptly.
B. Summer Care
In summer, the New Zealand sun can be harsh. Keep these tips in mind:
- Watering: Increase your watering frequency during hot, dry spells. Early morning is the best time to water to reduce evaporation.
- Mowing: Continue to mow regularly, keeping the grass at a higher height to provide shade to the soil.
C. Autumn Preparation
As temperatures cool, prepare your lawn for winter:
- Fertilizing: Apply a winter fertilizer that promotes root growth.
- Weed Control: Continue to manage any weeds that may have emerged.
D. Winter Care
Winter can be challenging for lawns. Protect your grass by:
- Minimizing Traffic: Limit foot traffic on the lawn to prevent damage.
- Monitoring Water Needs: Depending on rainfall, water if the grass shows signs of drought.
5. Dealing with Challenges
Despite your best efforts, challenges can arise. Here are common issues you might face and how to address them:
A. Thinning Grass
If your lawn appears patchy or thin, consider:
- Reseeding: Spot reseed any bare patches with fresh hydroseeding slurry, ensuring the area is well-watered.
- Fertilizing: Ensure that your fertilization schedule is appropriate for your lawn’s needs.
B. Erosion
If erosion is a concern, particularly on slopes, consider:
- Reinforcement: Use additional hydroseeding or erosion control blankets to stabilize the area.
- Retaining Walls: Consult professionals to install retaining walls where necessary to prevent soil loss.
C. Pest and Disease Management
Keep an eye out for pests or diseases that could affect your lawn.
- Identification: Regularly inspect your lawn for signs of pest damage or fungal infections.
- Control Methods: Use organic or chemical treatments as necessary, following the instructions carefully to protect your grass.

6. Working with Professionals
While maintaining a hydroseeded lawn is manageable for many homeowners, working with professionals can simplify the process and ensure optimal results. At Hydroseeding by LandscapingHQ, our team of experts can provide tailored advice, ongoing maintenance services, and solutions to any challenges you may face.
Conclusion
Maintaining a hydroseeded lawn in New Zealand requires attention, effort, and a clear understanding of your lawn’s needs throughout the seasons. By following these essential tips—from initial care post-hydroseeding to seasonal maintenance and addressing challenges—you can enjoy a lush, healthy lawn that enhances the beauty of your property.
Get Started Today!
At Hydroseeding by LandscapingHQ, we are dedicated to helping you create and maintain a thriving lawn. Whether you're looking to establish a new hydroseeded lawn or need ongoing maintenance, our team is here to assist you. Contact us today to learn more about our services and how we can help you achieve a healthy, beautiful lawn!